Tissue paper is a commonly used material inside the house. It’s so versatile that it can be used for almost anything including arts and crafts!
There is a lot of variety of tissue paper available in the market like facial tissue, toilet tissue, paper towels, table napkins, wrapping tissue with different kinds of texture, softness and some also have prints on it or even have scents. Regardless of the type, tissue papers can also be used in arts and craft ideas!
Here are some of the things that you can do with tissue paper!
Bleeding tissue paper art
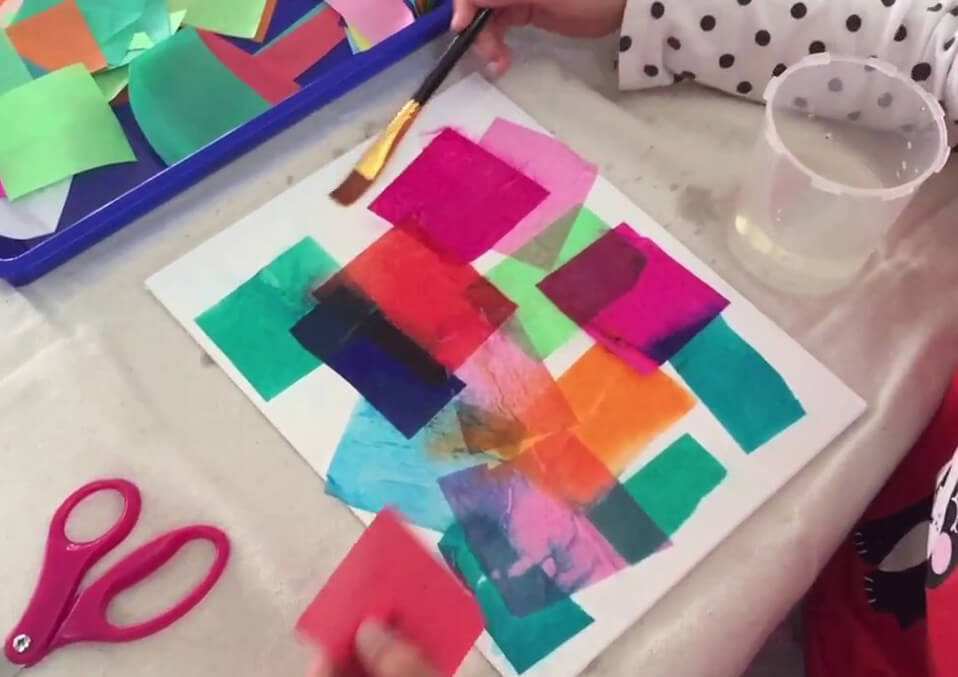
Did you know that you can also use tissue papers to paint? Here are the instructions on how to do that.
Materials needed:
- Watercolor paper
- Bleeding tissue paper
- Sharpie ( fine tip)
- Water and brush
- Sharpie ( fine tip)
Directions:
(You can choose different colored tissue paper)
Cut tissue paper into smaller pieces
Draw something on the watercolor paper
Wet the tissue paper strips and carefully lay it on the watercolor paper
Wait until the tissues are dry (about 5 minutes)
Gently remove the tissue and use your sharpie markers to add details to the painting
This simple and fun activity will get your kids more interested in arts and crafts! A better way to bond and explore different kinds of crafts with your active kids!
Pompom garland
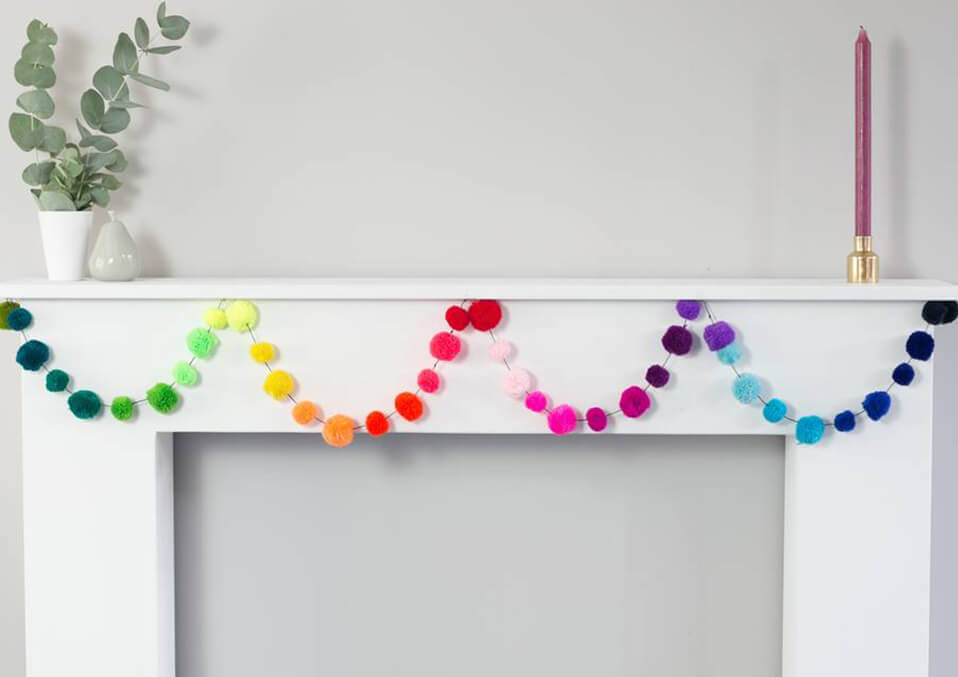
These garlands will surely come in handy to any occasion! If you opt to DIY your kids’ party why not start by making this absolutely gorgeous and super cute decoration!
Materials needed:
Colored tissue paper, scissors and a string. (can be paper twine or any string available to you) and glue.
Directions:
In order for you to make these pretty garland, you need to cut out at least 20-30 different colors of tissue paper into a flower. Cut the tissue into a round shape then fold the tissue paper into an accordion, back and forth folding and trim the excess paper after the last fold. Make 3 different sizes of these flowers and then put the three different sizes on top of each other starting with the biggest at the bottom and the smallest one at the top glue each flower to make them stick. Then put a small hole in the center of the flowers to insert the string, or you can glue it directly to the string to make it pop. Repeat the same steps until you can come up with a string of tissue paper flowers with your desired length
Paper Tissue Wreath
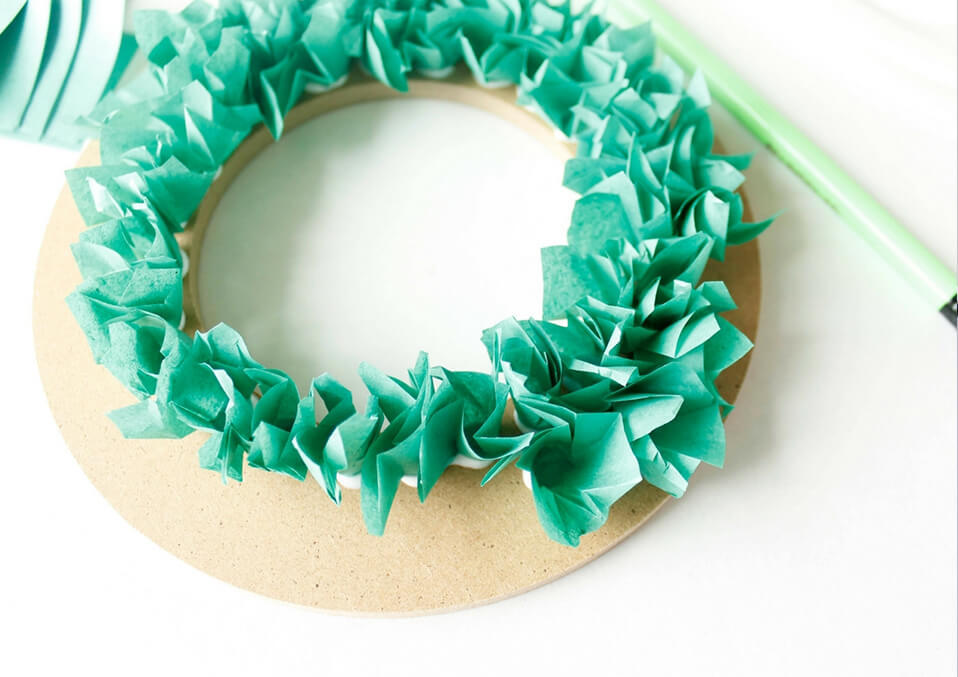
This project will definitely need adult supervision. You can also use this project for your DIY party! This wreath will sure come in handy on any occasion!
Things you need:
Colored tissue paper, glue, string, thick wire, and wire cutter.
Instructions :
(Make sure that you guide your child when using sharp objects for their safety.)
First, you need to cut the tissue paper 3/4th of the way into strips like pompoms, cut as much tissue paper pompoms you like until you can cover up the whole wreath. Next, you ask an adult to help you with the wire, make a circle shape with the wire and glue in your tissue paper pompoms around it. You can make it a colorful wreath or with just one color. Then you can definitely design your newly made wreath any way you like. You can put it in a stand or hang it on the wall, the decision is totally up to you.
Tissue paper flower
There’s a lot of things that you can do with just a tissue paper a scissor and a glue. For example, make a simple paper flower with these simple steps!
Materials you need:
Colored tissue paper, scissors, glue, floral wire, and wire cutter.
Instructions:
Cut the tissue paper into a petal-like shape. Make 5 petals with the same or different colors. Next, assemble each petal to make a flower, add a small round tissue in the center of the petal using the excess from the petal you cut. Next, glue it on top of the floral wire. Repeat steps with different colors of tissue paper.
And there you have it! Make it as a decoration in your house or you can make one and give it to your teacher as a sign of your appreciation. What better gift to give? The one you made with your heart!
Tissue paper bluebirds in a nest
This type of tissue paper project is a great activity to do with your children. You not only will be having fun making these birdies but also you get to have a bonding time with them and create happy memories with them.
Materials needed :
Paper plate, colored tissue paper, scissors, yellow or orange paper, googly eyes, colored paper (this is to make your bird), brown tissue paper, and glue.
Instructions:
The first thing that you need to do is cut out an oval shape from the colored paper to make the base of the bird. You can choose whatever color of paper you want. Next, cut the paper plate in half. Next cut out strips of the same colored tissue paper. Next, get a yellow or orange-colored paper for the beak, cut out a triangle to form the shape of the beak. Next, get the brown tissue paper and cut them out into strips and crumple it. Now you are ready to assemble your bird!
The first thing that you need to do is to get the base that you cut into an oval shape, then you glue it on the upper part of the paper plate. Next, you get the colored tissue paper and glue it in the body of the bird. Then get your googly eyes and the beak and assemble the face. The last thing that you need to do is to get the brown-colored strips that you crumpled and put it at the bottom part where it covers a bit of the bird.
Now your bird is ready! Put a string on it to hang it on the wall or you can hang it on your ceiling!
These fun activities will not only enhance your kids’ creativity but also enhance their relationship with you!
It’s always best to have time with your kids regardless of the tiresome day you have. Always remember that our children are always looking forward to bond with us. Have fun with them while their still young.
Read also:
- Parenting 101: How Financial Issues Affect Your Kids?
- Crafts and Kids: a Creative Way to Celebrate Memorial Day
- Creative and Healthy Ways to Cook Mac and Cheese for Your Kids